
| Chapter | Chapter Name | Unit | Level | Reading Time |
|---|---|---|---|---|
| BG009 | Remove the Defender & Overloading | Basic Guide | Beginner | 4 min |
Attack the Defender, Win the Target
Not every attack begins by capturing the strongest piece. Sometimes, the best move is to remove the piece protecting it. Other times, one defending piece is asked to protect two or more important targets at once. Learning to identify these situations will help you win material and create powerful combinations. In this chapter, you’ll discover two practical tactical ideas used in games at every level: Remove the Defender and Overloading.
Key Takeaways
- Understand the idea of removing a key defender.
- Learn how overloaded pieces become vulnerable.
- Recognise tactical opportunities created by weak defenders.
- Improve your calculation before making exchanges.
Remove the Defender
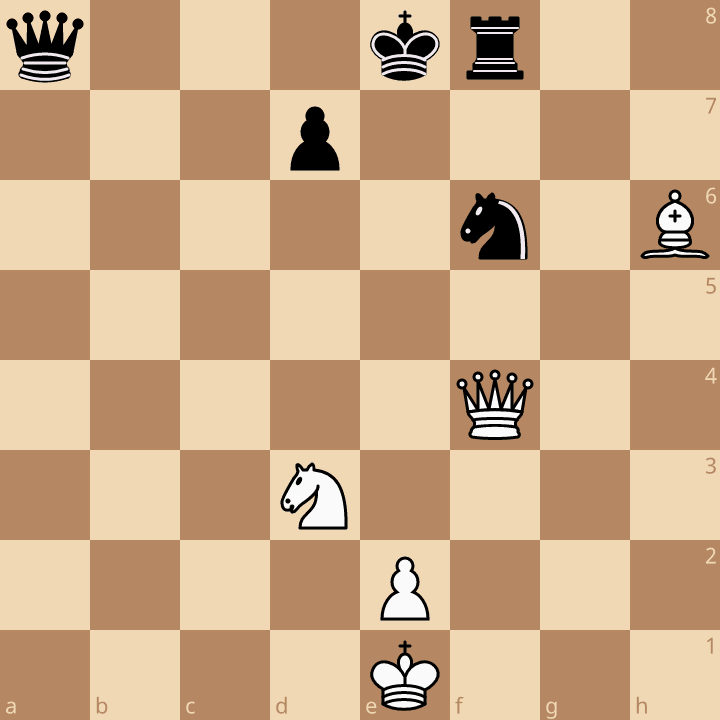
Black’s knight on f6 is protected by the Rook on f8. White wants to win the knight but cannot capture it immediately because of the Rook’s defence. Can you find the correct sequence to remove the defender and win material?
Every valuable piece is usually protected by another piece. If you can eliminate or distract the defender first, the defended piece may become vulnerable.
This tactical idea is known as Remove the Defender (also called Removing the Guard) and is one of the most effective ways to win material.
White begins with 1. Bxf8!, capturing the Rook that is protecting the knight on f6. Black is almost forced to reply 1…Kxf8, as allowing the bishop to remain would leave the position even weaker.
Now the knight on f6 no longer has a defender. White follows up with 2. Qxf6+, winning the knight and emerging a piece ahead.
The important lesson is that White never attacked the knight directly. Instead, White first removed its only defender. Before attacking an important piece, always ask yourself: “Who is defending it?” If you can eliminate that defender first, the combination often becomes possible.
Overloading
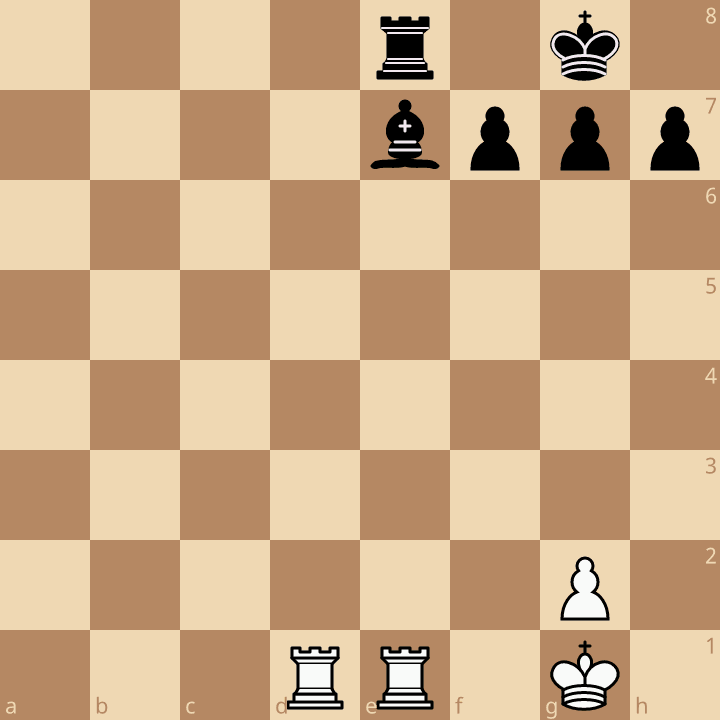
Black’s rook on e8 has an important job. It is protecting the back rank from checkmate while also defending the bishop on e7. Can White exploit the overloaded rook?
A piece is overloaded when it has more than one important defensive responsibility. It may be protecting two pieces, guarding a key square, or preventing checkmate at the same time.
Once that piece is forced to deal with one threat, it can no longer defend the other, allowing your opponent to win material or launch a decisive attack.
White begins with 1. Rxe7!, sacrificing the rook to attack the bishop on e7. Black has little choice but to reply 1…Rxe7, because losing the bishop would leave White with a winning advantage.
However, after the rook captures on e7, it is no longer protecting the back rank. White immediately takes advantage with 2. Rd8+!, creating a decisive attack. The rook could not perform both defensive duties at the same time.
The important lesson is that an overloaded piece cannot defend everything forever. When you notice one piece protecting multiple important targets, look for a way to force it to abandon one of its responsibilities.
Summary
Strong players don’t only look for attacks—they look for defenders. Whenever you spot an important piece, ask yourself:
- Who is protecting it?
- Can the defender be removed?
- Is one defender protecting too many things?
Answering these questions will help you discover tactical opportunities that are often missed by beginners.
Before You Play Your Next Game
Before every exchange, ask yourself:
- ✅ Is this piece defended?
- ✅ Can I remove its defender first?
- ✅ Is any opponent’s piece protecting two important targets?
Advice from the Coach
Many combinations begin with a simple observation: the defender is doing too much. Train yourself to notice defended pieces before making an attack. Often, the quickest way to win material is not by attacking the target directly, but by eliminating the piece that keeps it safe.
Did You Know?
- The tactic Remove the Defender is also known as Removing the Guard in many chess books.
- Overloading often appears in games involving queens and rooks because they are frequently responsible for defending multiple pieces and important squares.
- Many brilliant sacrifices work because a single defending piece is overloaded and cannot meet every threat.
| Previous Chapter: BG008 – Discover Hidden Attacks | Next Chapter : BG010 – Deflection & Decoy |