
| Chapter | Chapter Name | Unit | Level | Reading Time |
|---|---|---|---|---|
| BG013 | Smothered Mate | Basic Guide | Beginner | 3 min |
When Your Own Pieces Trap the King
A Smothered Mate is one of the most beautiful checkmate patterns in chess. It occurs when a king is completely surrounded by its own pieces and has no escape squares. A knight then delivers the final checkmate, making it one of the few mates that can be delivered by a single knight. Learning this pattern will improve your tactical vision and help you recognise powerful attacking opportunities.
Key Takeaways
- Learn how a Smothered Mate works.
- Understand why the knight is ideal for this pattern.
- Recognise when the king has no escape squares.
- Avoid trapping your own king with your pieces.
The Classic Smothered Mate
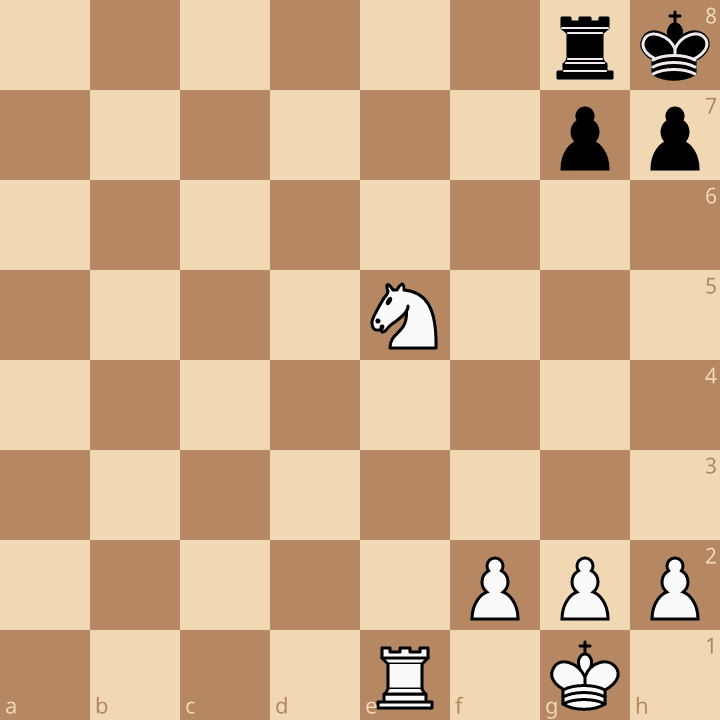
Black’s king is surrounded by its own pieces and has no safe escape squares. White has an opportunity to finish the game with a tactical combination.
Can you find the checkmate?
A Smothered Mate occurs when a king is completely trapped by its own pieces or pawns, leaving no escape squares. A knight then delivers checkmate because its unique movement cannot be blocked or captured by the trapped king.
White begins with a forcing sequence that drives the black king into a completely closed position. Once every escape square is occupied by Black’s own pieces, White plays Nf7#.
The knight delivers checkmate because it attacks the king without standing next to it. Since the king is surrounded by its own army, there is no escape square, no piece can block the knight’s attack, and the knight cannot be captured.
The important lesson is that the knight is powerful when the opponent’s king has no room to move.
Smothered Mate with a Rook
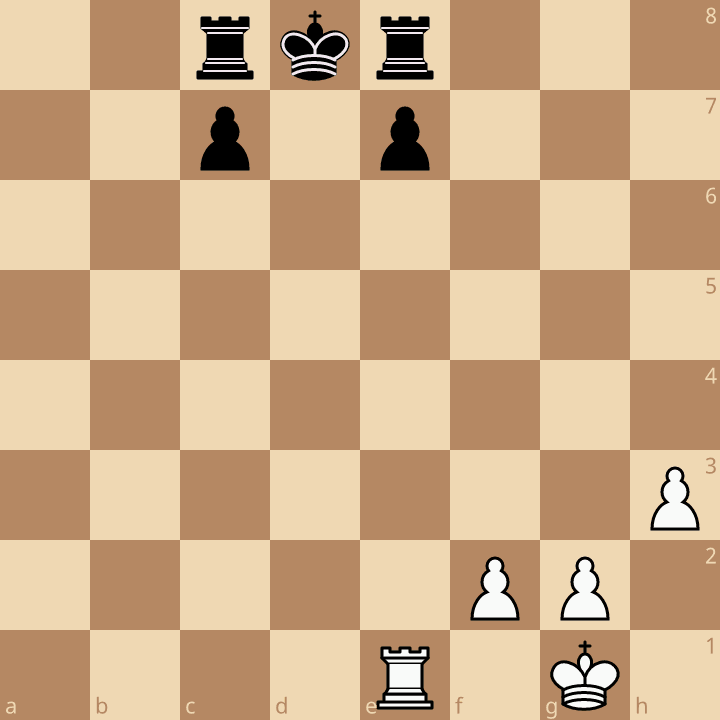
Black’s king is surrounded by its own rooks and pawns. White has a chance to deliver checkmate with a single rook move.
Can you find the winning move?
A Smothered Mate occurs when a king is completely trapped by its own pieces or pawns, leaving no escape squares. The attacking piece then delivers checkmate because the king cannot move to safety. Although this pattern is most commonly seen with a knight, other pieces, such as a rook, can also deliver a smothered mate when the king has no room to escape.
White plays 1. Rd1#.
The rook attacks the black king along the d-file. The king cannot capture the rook. It also cannot escape because its own pieces block every available square. The rooks on c8 and e8, together with the pawns on c7 and e7, completely surround the king.
The important lesson is that the rook alone does not trap the king. The king is trapped by its own pieces, allowing the rook to deliver the final checkmate. Whenever you see a king with no escape squares, look carefully—you may have a winning checkmate in one move.
Summary
Smothered Mate teaches one important lesson:
- Watch for trapped kings.
- Knights become especially dangerous in closed positions.
- Give your king enough space to avoid tactical traps.
Before You Play Your Next Game
Before launching an attack, ask yourself:
- ✅ Is my opponent’s king trapped by its own pieces?
- ✅ Can my knight create a checkmate?
- ✅ Does my own king have enough space to escape?
Advice from the Coach
Many beginners underestimate the knight because it moves differently from other pieces. In reality, the knight is one of the strongest attacking pieces against a trapped king. Whenever you notice that your opponent’s king has no escape squares, look carefully for a knight check—it may be stronger than you expect.
Did You Know?
- Smothered Mate is one of the few checkmates delivered by a single knight.
- Because a knight jumps over pieces, its attack cannot be blocked.
- Many famous Smothered Mates begin with a queen sacrifice that forces the king into a trapped position.
| Previous Chapter: BG012 – Back Rank Mate | Next Chapter : BG014 – Ladder Mate |