
Chapter 3
Middlegame Mastery
MG003
CLEARANCE
Move the Obstacle. Unlock the Tactic.
Clearance is a tactical idea in which one of your own pieces is moved, captured, or sacrificed to free a critical square, file, rank, or diagonal for another piece.
The piece that moves may appear to be doing an important job. But sometimes its greatest value is in getting out of the way.
The important question is: Is one of my own pieces blocking my strongest idea?
Clearance can lead to checkmate, material gain, a decisive attack, or the creation of a powerful tactical threat.
How to See Clearance
When you are looking for a tactic, don’t only look at what your pieces are attacking.
Look at what they are blocking.
Ask yourself:
- Is one of my own pieces occupying a critical square?
- Is a file, rank, or diagonal blocked by my own piece?
- Would another piece become much stronger if this piece moved?
- Can I move the blocking piece with tempo?
- Can I sacrifice it to force the opponent to remove it?
- What becomes possible once the square or line is cleared?
Think of the pattern as:
Blocked Square / Line → Clear the Obstacle → Stronger Piece Takes Over → Tactical Consequence
The important insight is that the first move may not attack the final target at all.
Sometimes the best tactical move is simply: “Get out of the way.”
Practical Examples
Example 1 — Vacating the Square
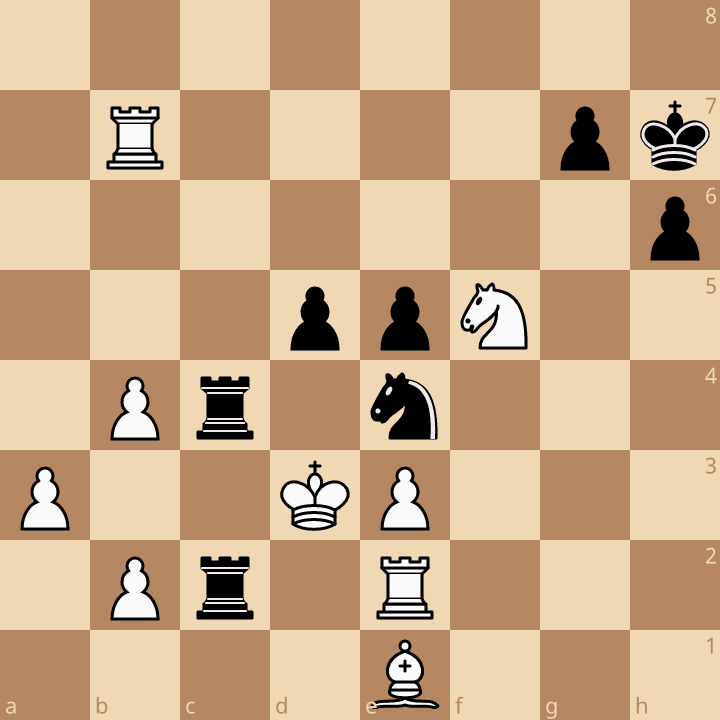
Can you see which piece needs to get out of the way?
At first glance, White appears to have the advantage, with an extra minor piece and a well-supported king. But Black notices that the f4-square is the key to the position. The problem?
Black’s own knight is occupying the way.
The brilliant move: 1…Nf2+!! is a clearance sacrifice. Black gives up the knight while forcing White to respond to the check. White’s best response is: 2.Rxf2
At first, it appears that White has simply won another piece. But that is exactly what Black wanted. The knight has disappeared from the critical square, clearing the way for the pawn.
Now comes: 2…f4# The pawn delivers checkmate. White’s own pieces restrict the king’s escape squares, while the newly cleared route allows the pawn to deliver the final blow.
The knight was not sacrificed because it was useless. It was sacrificed because its removal unlocked the real tactic.
Clear the square → Activate the pawn → Checkmate
Solution: 1…Nf2+!! 2.Rxf2 f4#
Example 2 — Sacrificial Clearance
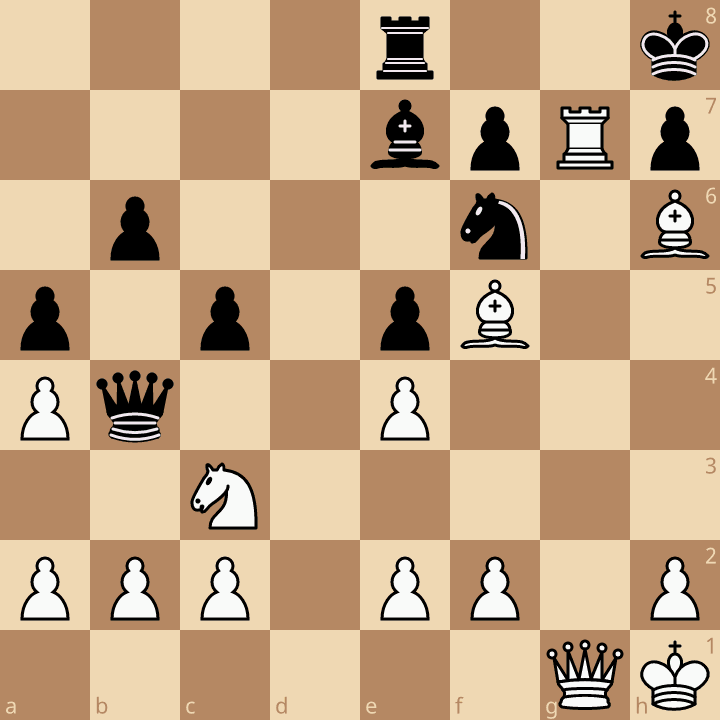
Can you remove your own piece to make the queen unstoppable?
White has built a powerful attack against the Black king. The rook, bishop and queen are working together, but there is a problem. The rook on g7 occupies a critical square. If the rook disappears, the queen can take its place and deliver the decisive blow.
White therefore plays: 1.Rxh7+!! This is a sacrificial clearance. Black responds: 1…Nxh7
The rook has been removed from the board. But now the g7-square is free. White immediately exploits the cleared square: 2.Qg7#
The queen occupies the square previously blocked by the rook and delivers checkmate. Black’s king has no escape, and the surrounding pieces cannot prevent the final move.
The rook’s job was not to survive. Its job was to clear the square for the queen.
Sacrifice the blocker → Clear the square → Queen takes over → Checkmate
Solution: 1.Rxh7+!! Nxh7 2.Qg7#
The Thinking Process
When you find yourself looking for a tactic, don’t only ask: “What can I attack?”
Also ask:
- 1. What is my strongest piece? – Which piece could create the decisive threat?
- 2. What does it need? – A square? A file? A diagonal? A rank?
- 3. What is blocking it? – Sometimes the obstacle is your own piece.
- 4. Can I move it? -If not, can I sacrifice it or force the opponent to remove it?
- 5. What happens after the clearance? -This is the critical calculation.
Don’t stop at the sacrifice. Calculate what the cleared square or line allows next.
Clearance in Three Steps
Blocked → Clear → Exploit
Or remember: Sometimes your own piece is the obstacle between you and the winning move.
A clearance may involve:
Moving a piece
Sacrificing a piece
Forcing the opponent to remove it
The important thing is what becomes possible after the square or line is free.
Before You Play Your Next Game
When you see a promising attacking idea, ask:
- Which of my pieces is strongest?
- What square or line does it need?
- Is one of my own pieces blocking it?
- Can I move the blocker with tempo?
- Can I sacrifice it to clear the way?
- What is my strongest move after the clearance?
And remember: Don’t just look for what your pieces can attack. Look for what they are preventing each other from doing.
Advice from the Coach
Sometimes the best move is to move the piece that is doing nothing wrong.
A piece can be well placed and still be in the way.
Strong players recognise when a piece has completed its job and can be moved—or sacrificed—to unlock another piece.
Don’t ask only, “Where should this piece go?”
Ask, “What becomes possible if this piece gets out of the way?”
Did You Know?
- Clearance combinations are often especially beautiful because the first move appears to give something away.
- A piece moves, gets captured, or sacrifices itself—and only then does the real idea become visible.
- The tactical value isn’t in the piece that disappears.
- It’s in what the remaining pieces can do once the obstacle is gone.